Now here’s a bandwagon onto which I’d love to jump aboard. Contouring. The art of creating shadow on the parts of the face that you want to recede via the crafty application of color.
I’m about at the same stage of learning how to do this as I am with learning how to drive a standard shift car. I could explain to you in words exactly how and why you proceed through each step. When and why you depress the clutch, what the purposes of the different gears are, which gears are synchronized and which aren’t (thanks, Dad!). But I haven’t quite mastered the motor skill/muscle memory to actually physically drive the vehicle without some disturbingly frequent stalling.
Similarly, I can reasonably-well describe how and why to contour, which colors to use, where to place the color, but I am insufficiently confident in my actual application to leave the house without worrying that I’ll look like the only free-walking zebra on the eastern coast of the U.S (and don’t get me started on zoos).
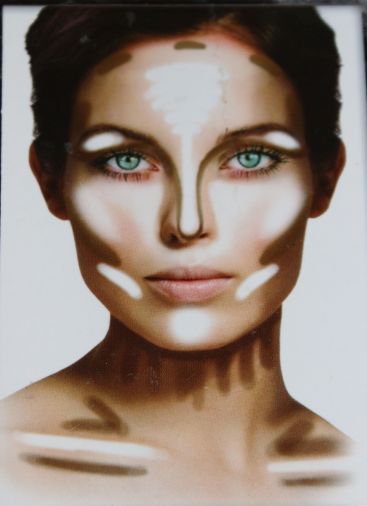
Thanks to It Cosmetics, here’s a map showing the array of possible places on the face to contour. You’ll notice there are complementary areas of the face that are “highlighted” (i.e., brought forward through the use of lighter colors). Stay tuned for an upcoming post on that!
Possibly the most natural way to achieve these contrasts (barring genetic blessing) is through a technique like that taught by Eve Pearl, “reverse contouring” with foundation shades. She describes it really well in her book, Plastic Surgery without the Surgery: The Miracle of Makeup Techniques. Basically, you’re using foundation shades slightly darker and lighter than your skin. This is one I definitely need to practice with more, especially since I have one her foundation kits with which to try it out.
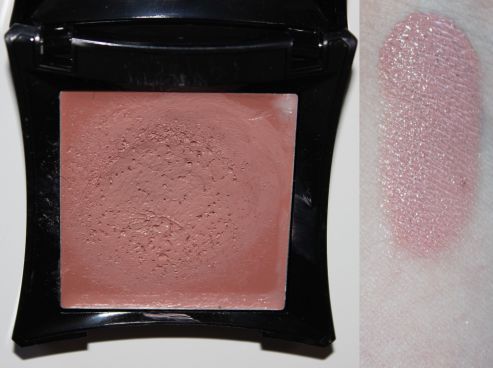
Blush as sculptor: This is probably my preferred method. I use blush to kind of sculpt, while also adding some color into my face. Most of my collection is made up of powder blushes, but I do have one creme blush that I quite like.
The colors
For my skin color and tone, I find the best colors to use for this are neutral, dusty pinky mauves.

The application
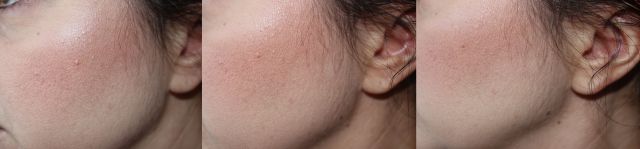
The application style is reminiscent of the decade of my birth, the 1970s! I place the most color at the back of my cheekbone, fading as it progresses toward the apple of my cheek. The exception to this is the cream blush, which I do tend to focus a bit more on the apples. The 3/4 of an inch or so on either side of the nose remain no-color zones regardless!
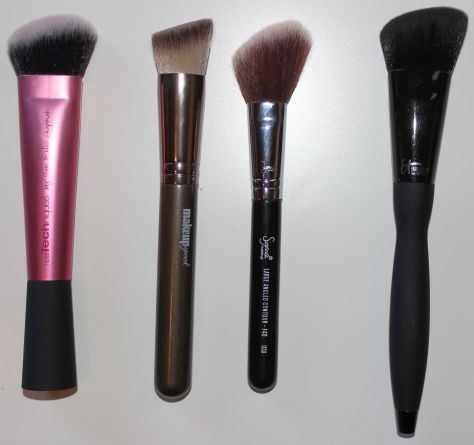
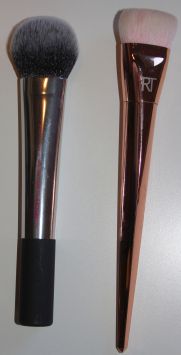
My preferred brushes to use are angled brushes; all of mine are synthetic so they handle powder and cream products equally well.
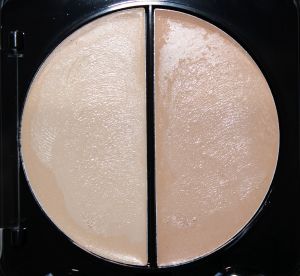
In addition to individual blushes, I also have a few palettes that hold good sculpty blush colors, in addition to actual contour shades.
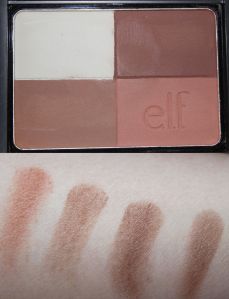
Swatches Left to Right: Bottom Right Quadrant (the most likely blush candidate for me), Bottom Left Quadrant, Upper Right Auqdrant, All four shades swooshed together

Swatches Top to Bottom Middle Left Pan, Middle Right Pan (most likely blush candidate for me)

Swatches Left to Right: Large Bronze Half, Upper Right Third (most likely blush candidate for me)
Finally, for when I’m feeling like throwing caution to the wind, I do have a couple of actual contour shades Being pale, with some redness under the skin, I have to avoid anything that is too warm / orangey because those products end up looking really muddy on me. As with blushes, these sorts of products come in powder and creme forms. For the contouring novice, I think powders require less blending and are less likely to look stripy, so I tend to go for one of the darker powder shades in the palettes shown above. People who are experienced in contouring rave about cream products, as they melt into the skin and look less makeupy.

Let me know what your favorite contouring tips are 🙂
*These are only my opinions, formed through my personal experience as a consumer. I am not a medical doctor, an aesthetician, or a health/beauty professional. There is no guarantee what effect, positive or negative, these products may have on anyone else.
**All products were purchased by me from brands that, to the best of my knowledge, are cruelty-free.

I am in the same boat with wanting to try contouring, knowing the “technique”, but finding the application process daunting. I think it’ll take me a few tries in the safety and non-judgemental environment of my bedroom, but every little bit helps! Great post and hang in there with the stick shift.. one day it’ll just click and you’ll never forget it 😉
LikeLiked by 1 person
Thank you for the words of encouragement! 😊🚗
LikeLiked by 1 person
I’ve nominated you for the Real Neat Blog award! If you’d like to do it, all of the details can be found at https://beautyforgood.net/2015/05/05/real-neat-blog-award/. And thank you for your support 🙂
LikeLike
Thank you so much for your kind words and support! I look forward to doing this! X
LikeLike
Nice 🙂 check out my contouring post at : francescavenus.wordpress.com ❤
LikeLike
Wow, you are clearly much more clever at contouring than I 👍🏻… Sleek as some great stuff and they’re cruelty-free 🐶😍🐰
LikeLike